Solving CAPTCHAs in n8n with CapMonster Cloud
n8n is a workflow automation platform where scenarios are built from interconnected nodes. Each node performs a separate action: starts a workflow, sends an HTTP request, processes data, or connects to an external service. n8n can be used in the cloud or deployed on your own server.
CapMonster Cloud is used in n8n to automatically solve CAPTCHAs within a workflow. The node sends CAPTCHA parameters to the service, receives a token or another solution result, and passes it to the next nodes—for example, to submit a form, make an API request, or continue collecting data from a web page.
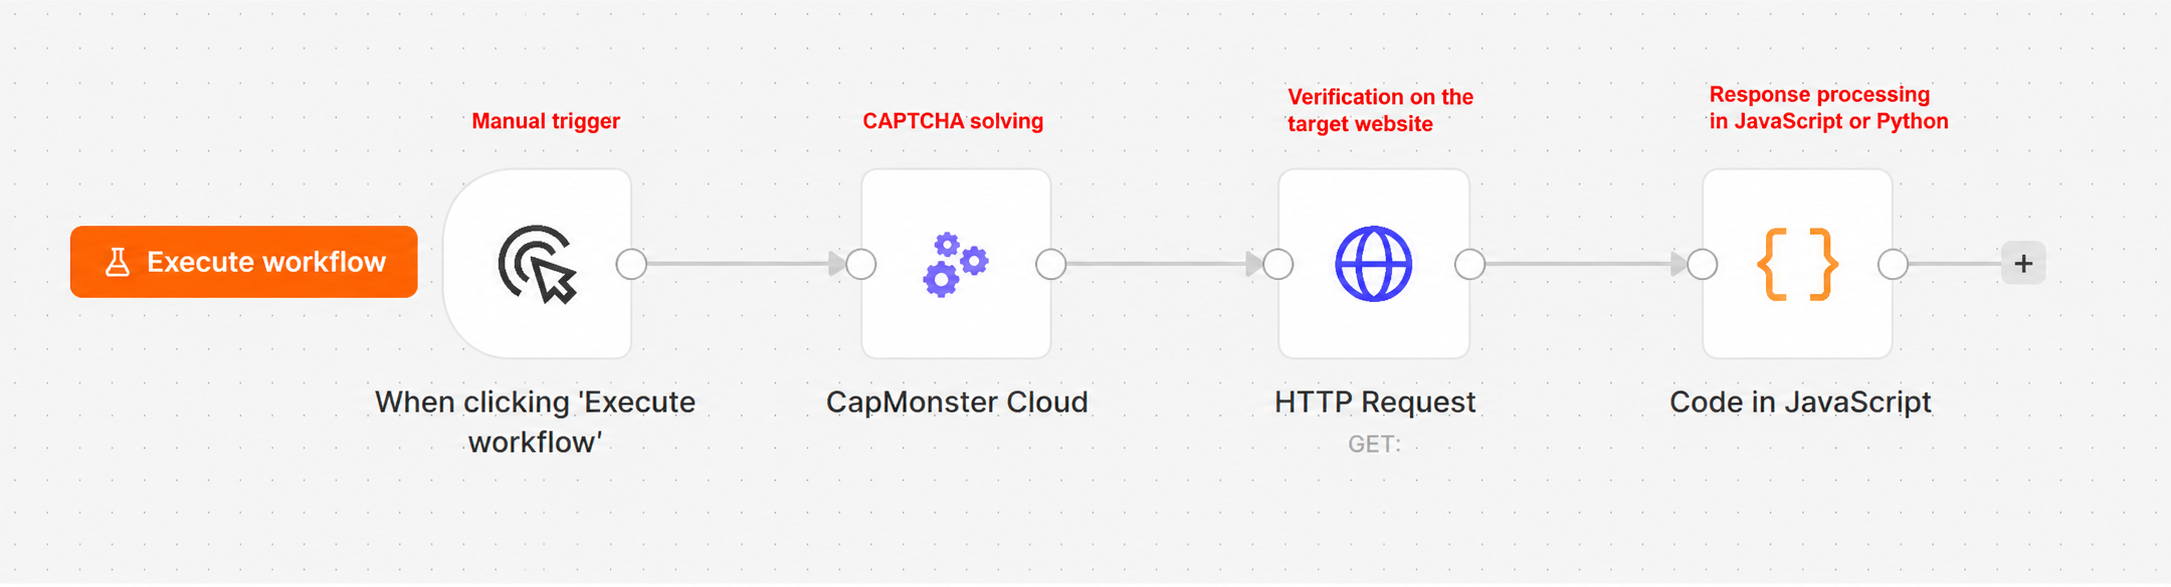
A basic workflow may look as follows:
Installation methods
Installation from the nodes panel
- Open a workflow.
- Click Add first step... or +. If necessary, rename the workflow by replacing the default name
My workflow, for example, withCapMonster Cloud workflow.
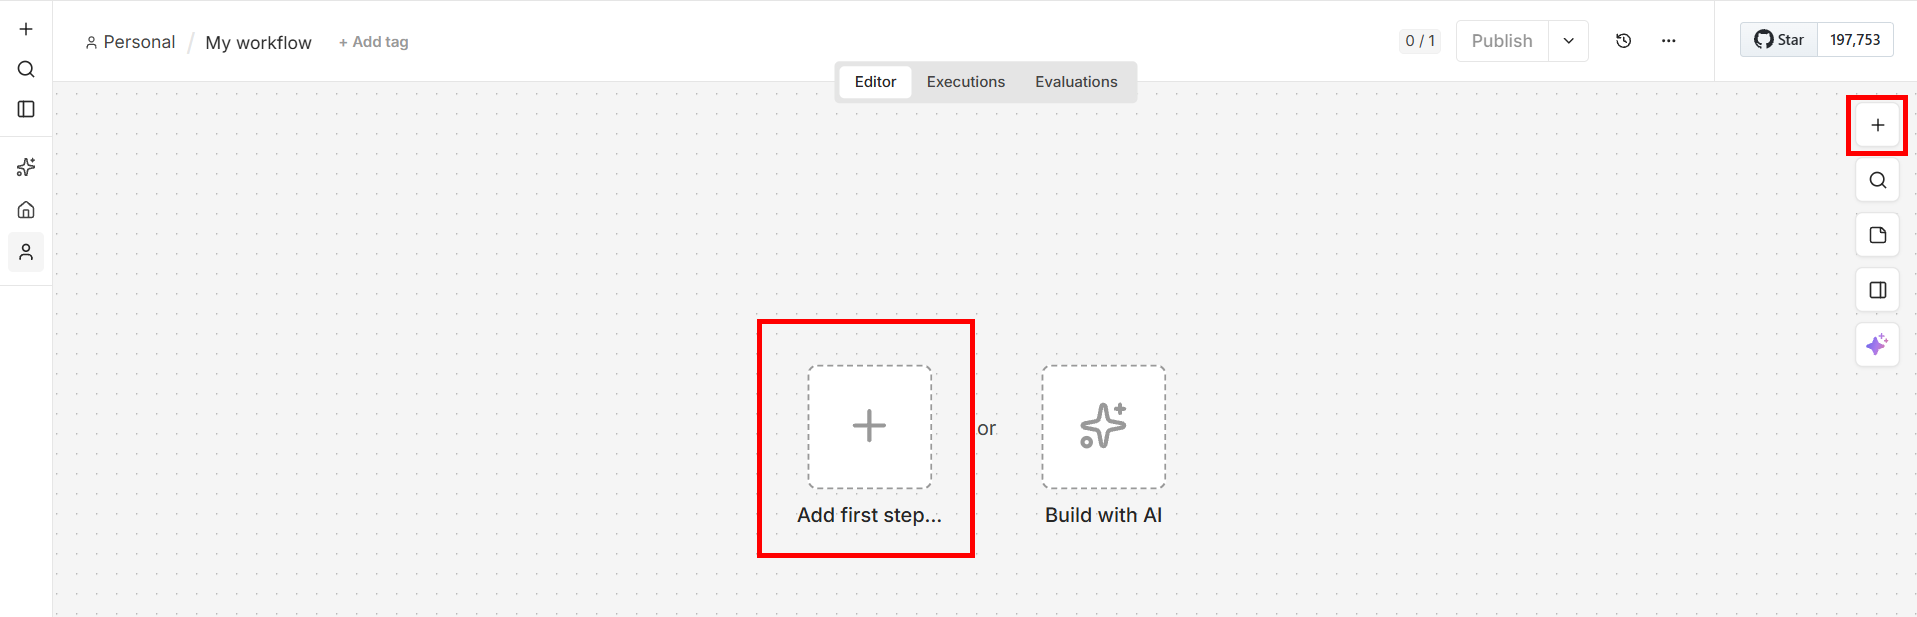
- Enter "CapMonster Cloud" in the Search nodes... field.
- Select the node from the search results.
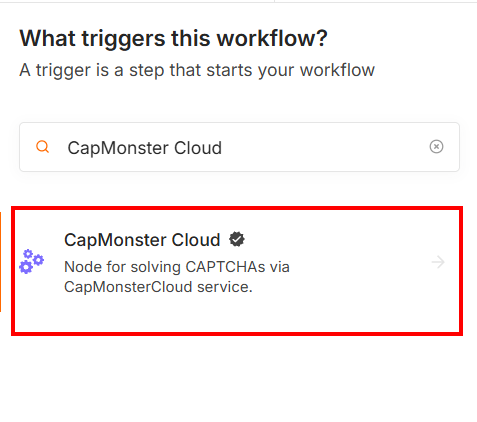
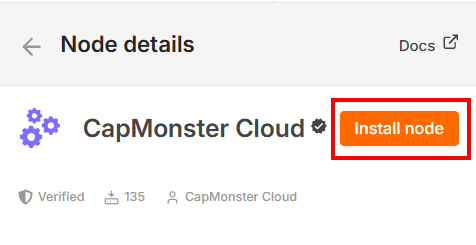
- Click Install node:
Installation via npm
This method is intended for self-hosted n8n and requires access to the server or computer where the service is deployed. After installing the package, restart n8n so that the CapMonster Cloud node appears in the nodes panel.
-
Stop the running n8n instance.
-
Open a terminal on the server.
-
Go to the n8n custom nodes directory:
cd ~/.n8n/nodes
If the directory does not exist yet, create it:
mkdir -p ~/.n8n/nodes
cd ~/.n8n/nodes
- If the directory does not contain a
package.jsonfile, create one:
npm init -y
- Install the CapMonster Cloud package:
npm install @zennolab_com/n8n-nodes-capmonstercloud
-
Start or restart n8n.
-
Open a workflow, click +, and find the CapMonster Cloud node.
You can check the installed package version with the following command:
npm list @zennolab_com/n8n-nodes-capmonstercloud
Do not install the package globally with the -g option. It must be located in the custom nodes directory of the n8n instance where it will be used.
Updating and uninstalling the package
Through the n8n interface
If the node was installed from the nodes panel:
- Open Settings → Community nodes.
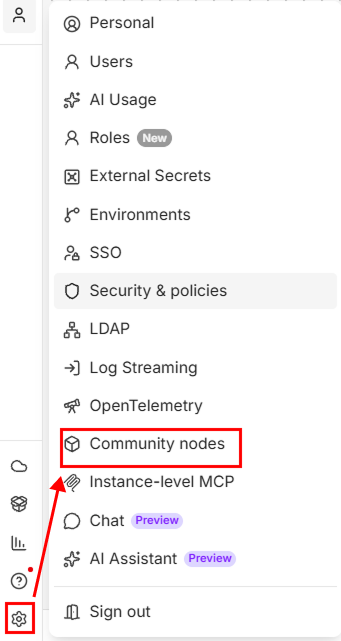
- Find the CapMonster Cloud package.
- Open the Options menu using the
⋮button. - Select the required action:
- Update package – install an available newer version;
- Uninstall package – remove the package.
- Restart n8n if necessary.
-
The Update package button is displayed only when a new package version is available.
-
After the package is removed, existing workflows containing the CapMonster Cloud node will remain, but they will not run until the package is installed again.
Via npm
cd ~/.n8n/nodes
To install the latest available version, run:
npm install @zennolab_com/n8n-nodes-capmonstercloud@latest
To remove the package, run:
npm uninstall @zennolab_com/n8n-nodes-capmonstercloud
Restart n8n after updating or removing the package.
After the package is removed, existing workflows containing the CapMonster Cloud node will remain, but they will not run until the package is installed again.
Configuring the CapMonster Cloud node
The Triggers section displays the available ways to start a workflow:
On a Schedule – starts the workflow automatically according to a specified schedule. For example, the workflow can run at certain intervals, daily, or according to a cron expression. For more information, see the n8n documentation: Schedule Trigger.
On a Webhook call – starts the workflow when an HTTP request is sent to the webhook URL. This method is suitable when CAPTCHA parameters are passed from an external application, website, or browser automation script. For more information, see the n8n documentation: Webhook.
The No CapMonster Cloud Triggers available message means that the CapMonster Cloud node cannot start a workflow on its own. Add it after a trigger or another node that passes CAPTCHA parameters.
To return the result to an external application after starting the workflow through a webhook, you can use the Respond to Webhook node.
A typical node sequence is:
Trigger → CapMonster Cloud → use the obtained result
For a workflow started through a webhook, the sequence may look as follows:
Webhook → CapMonster Cloud → Respond to Webhook
The Actions section contains all CAPTCHA types available for solving:
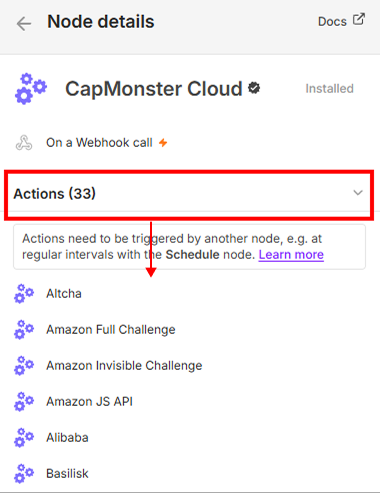
- Select the required CAPTCHA type.
- Click Create new credential.
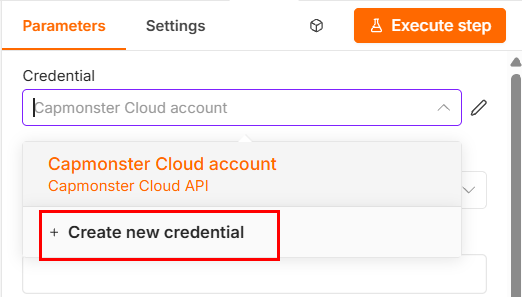
- Enter your CapMonster Cloud API key in the window that opens.
- Paste the key into the API Key field and save it.
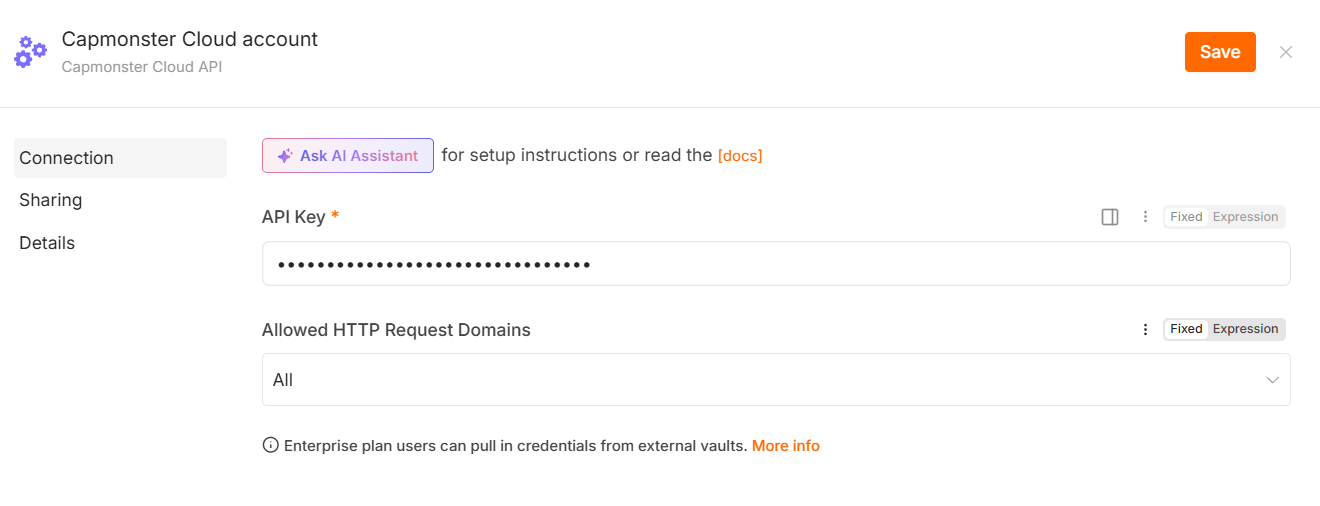
- Fill in all required parameters.
-
Do not pass the API key directly in workflow parameters or publish it in an exported JSON file. Store the key in n8n Credentials and restrict access to the credentials.
-
Some CAPTCHA types also require a proxy. The relevant requirements are listed in the documentation for the selected CAPTCHA type.
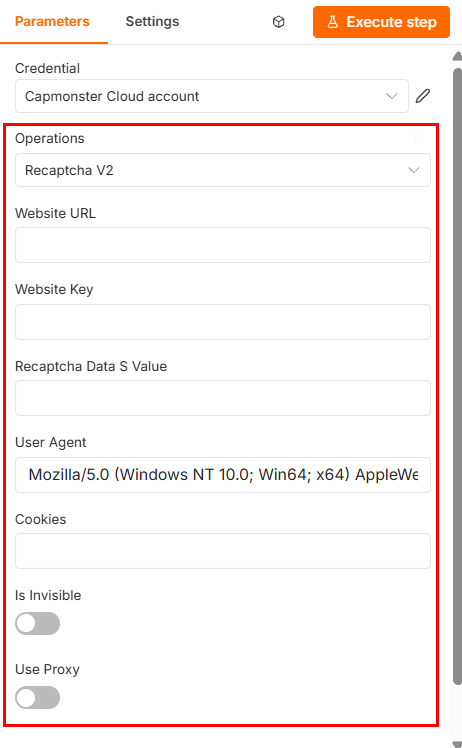
-
Detailed parameter descriptions and instructions for obtaining their values are available in the CAPTCHA Types section. Select the required CAPTCHA type and open the corresponding article.
-
The current User-Agent is set automatically.
The Settings tab controls the node behavior:
- Always Output Data – return data even when the result is empty.
- Execute Once – execute the node once for all input data.
- Retry On Fail – retry execution if an error occurs.
- On Error – select what to do when an error occurs.
- Notes – add a comment to the node.
- Display Note in Flow – display the comment in the workflow diagram.
These settings can usually be left unchanged.
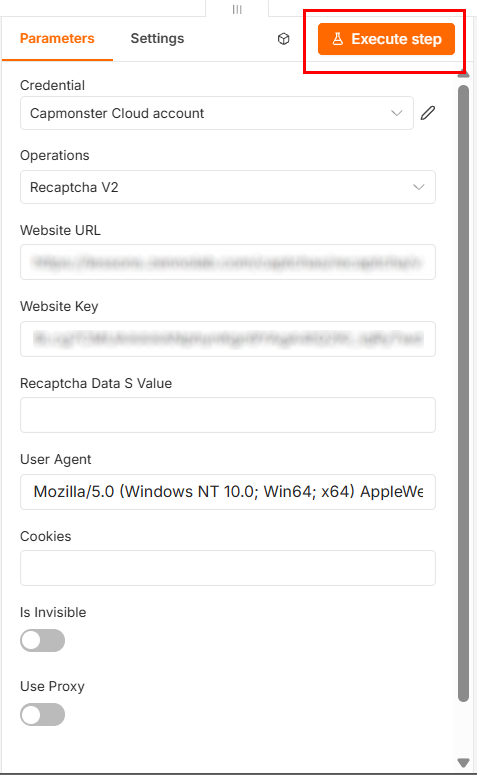
- After filling in all fields, click Execute step:
-
Execute step runs only the selected node;
-
Execute workflow runs the entire workflow.
If the task is completed successfully, an object containing the solution result will appear in the OUTPUT panel. For example, for reCAPTCHA v2, the response will contain a field with the obtained token:
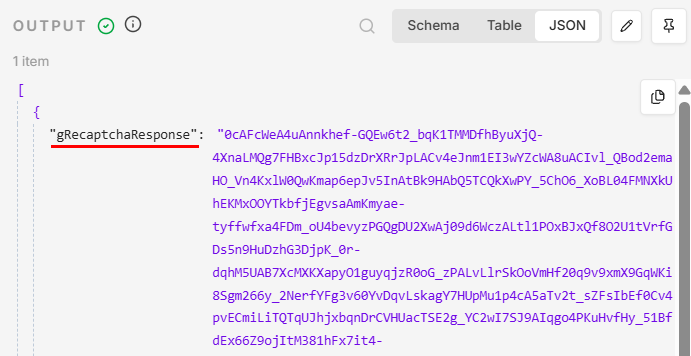
The obtained response must be passed to the next workflow node and used when sending a request to the target website.
The solution result may have a limited validity period, so it is recommended to use it immediately after receiving it.
Typical use cases
The CapMonster Cloud node can be used in n8n workflows where the next step depends on the CAPTCHA solution result.
Collecting data from web pages
When collecting publicly available data, a website may require a CAPTCHA to be completed before displaying a page or processing a search request.
A typical node sequence is:
Trigger → HTTP Request → CapMonster Cloud → HTTP Request → data processing
The workflow can perform the following actions:
- Open the target page with HTTP Request.
- Obtain the CAPTCHA parameters.
- Pass them to the CapMonster Cloud node.
- Receive a token or another solution result.
- Repeat the request to the page with the CAPTCHA result.
- Extract the required data using the HTML, Code, or Edit Fields nodes.
- Save the result to a file, table, or database.
Submitting web forms
The node can be used in workflows where a CAPTCHA result must be obtained before submitting a form.
A typical sequence is:
Get data → CapMonster Cloud → HTTP Request → check the response
For example, the workflow can:
- Receive form data from a webhook, table, or another node.
- Solve the CAPTCHA.
- Add the obtained token to the request body.
- Submit the form using HTTP Request.
- Check the website or API response.
The name of the parameter used to pass the token depends on the target website implementation.
Working with APIs
Some APIs require a CAPTCHA result together with the other request parameters.
A typical sequence is:
Trigger → CapMonster Cloud → HTTP Request → Code
After the CapMonster Cloud node runs, the result can be passed in the JSON body, query parameters, or request headers, depending on the API requirements.
For example:
{
  "captchaToken": "{{$json.solution.gRecaptchaResponse}}",
  "action": "submit"
}
The result structure and path to the token depend on the selected CAPTCHA type.
Browser automation
The solution result can be passed to an external browser automation script, for example, Playwright, Puppeteer, Selenium, or ZennoPoster.
Example sequence:
Webhook → CapMonster Cloud → HTTP Request → browser automation script
In this case, n8n can:
- Receive CAPTCHA parameters from an external script.
- Create a task in CapMonster Cloud.
- Return the result through a webhook or API.
- Pass the token to the browser session.
- Continue running the script.
With this approach, it is important to use the result in the same browser session for which the CAPTCHA parameters were obtained.
Batch processing
If the input node returns multiple items, n8n can create a separate task for each item.
For example:
Google Sheets → Loop Over Items → CapMonster Cloud → HTTP Request
This workflow is suitable for sequentially processing a list of pages or tasks.
For batch processing, it is recommended to:
- limit the number of tasks running simultaneously;
- use Loop Over Items or another queue management mechanism;
- handle errors separately for each item;
- do not enable Execute Once if a CAPTCHA must be solved for each input item;
- take the CapMonster Cloud account limits and balance into account.
Working with the HTTP Request node
To use the obtained solution result, add an HTTP Request node after the CapMonster Cloud node.
- Click + next to the CapMonster Cloud node.
- Find and select HTTP Request.
- Specify the request method and the target page or API address.
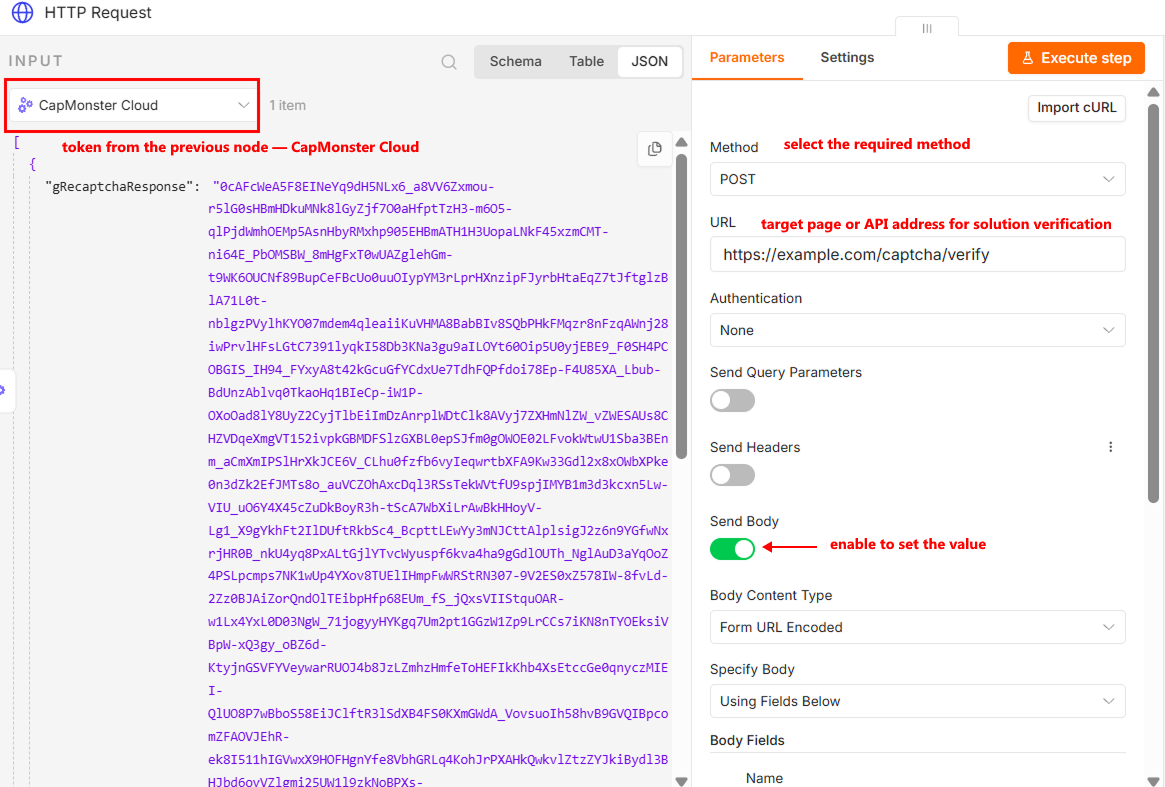
- Add headers, query parameters, cookies, and the request body if necessary.
If the target website uses a session, send the CAPTCHA result with the same cookies, proxy, headers, and other parameters that were used when opening the page. Changing session parameters may cause the result to be rejected.
- In the field intended for the CAPTCHA result, pass the value from the previous node using an Expression.
For example:
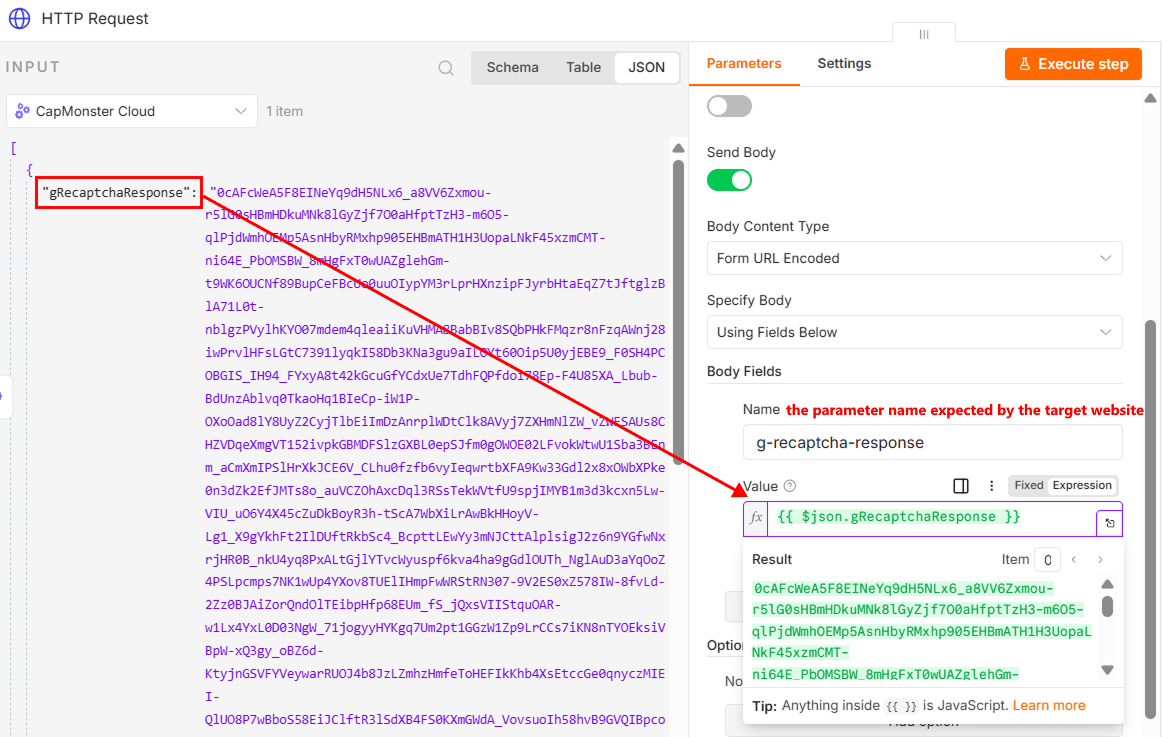
- After submitting the CAPTCHA result, you will receive a response from the target page or API. The response format depends on the endpoint being used: it may be an HTML page, a JSON object, or another data type.
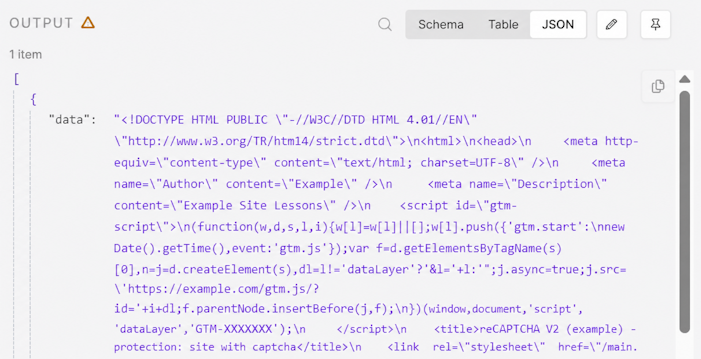
Additionally:
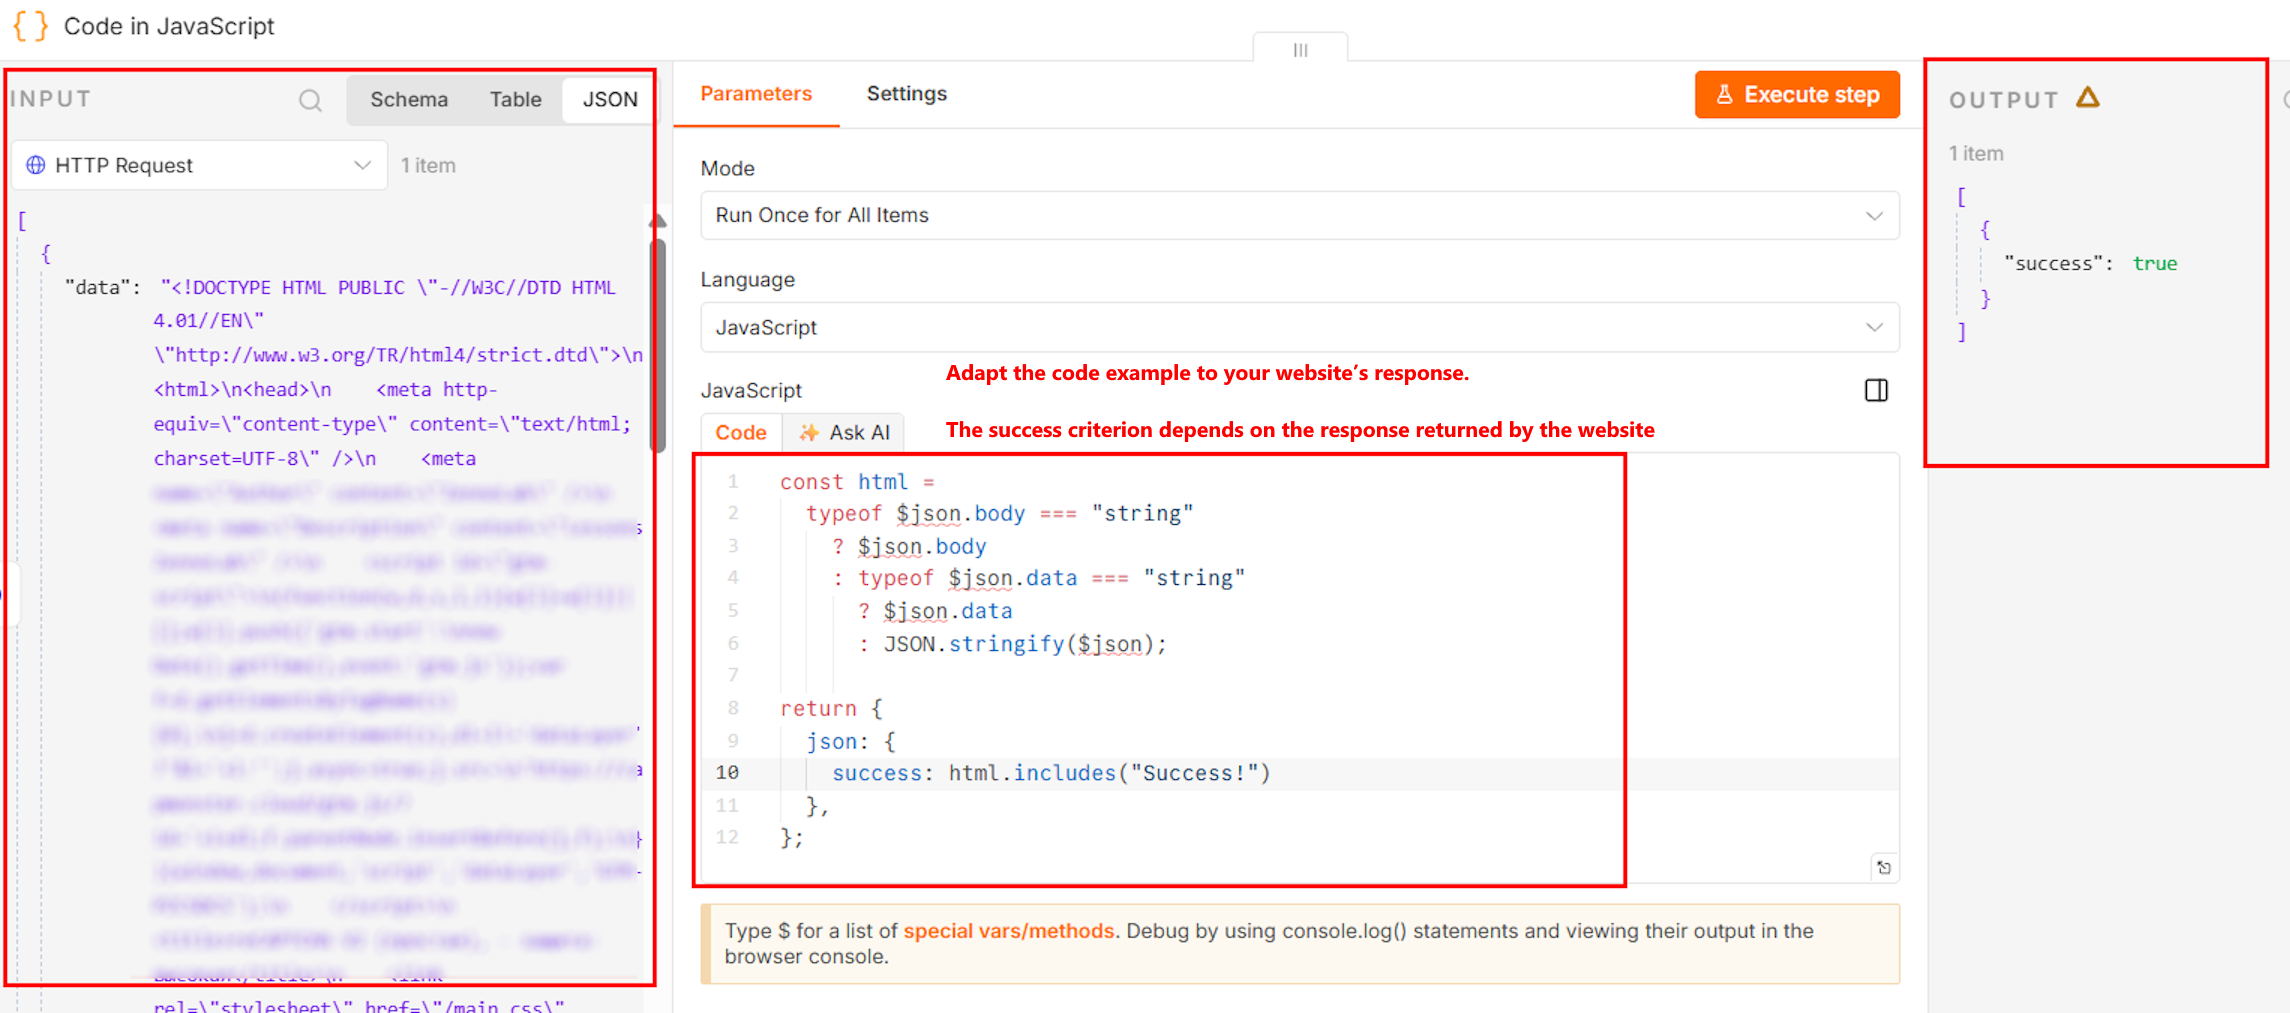
To check the result automatically, you can add a Code node after HTTP Request.
The verification method depends on the response from the target website. In the Code node, you can check the HTTP status, the final URL after a redirect, the presence of an expected element in the HTML, whether a cookie was set, or another indicator that the request was processed successfully.
Checking an HTML response
For example, if the text "Success!" is displayed on the page after successful verification, you can automatically check the result using the following code in the Code node:
const html =
  typeof $json.body === "string"
    ? $json.body
    : typeof $json.data === "string"
      ? $json.data
      : JSON.stringify($json);

return {
  json: {
    success: html.includes("Success!")
  },
};
Checking a JSON response
If the API returns JSON, check the required field directly. For example, for the following response:
{
  "success": true,
  "status": "verified"
}
you can use the following code:
return {
  json: {
    success:
      $json.success === true &&
      $json.status === "verified"
  },
};
Replace the field names and expected values according to the response returned by the API you are using.
Exporting and transferring a workflow
Credentials are not included when a workflow is exported. After importing the workflow into another n8n instance, you must create the Credentials again and select them in the CapMonster Cloud node.
Debugging a workflow
To inspect data between nodes, you can:
- open the OUTPUT tab;
- temporarily pin the result using Pin data;
- add an Edit Fields node to transform the data structure;
- use a Code node to check and normalize the response;
- view the execution history in the Executions section.
Error handling
If the node finishes with an error:
- Open the OUTPUT tab.
- Check the error code and message.
- Make sure the CAPTCHA parameters are correct.
- Check the account balance and API key.
- Make sure the proxy is available and suitable for the selected task type.
- For temporary errors, enable Retry On Fail in the Settings tab.
| Problem | Possible cause |
|---|---|
| The node is not displayed | The package is not installed or n8n was not restarted |
| Authorization error | Invalid API key |
| The task takes too long | The CAPTCHA is complex or the proxy is unstable |
| The token is rejected by the website | The token has expired or the session was changed |
| No result is returned | Incorrect CAPTCHA parameters |
CAPTCHA-solving errors are described in the dedicated section.