MCP
Model Context Protocol (MCP) allows AI agents to connect to external tools and services.
CapMonster Cloud MCP provides the agent with tools for working with CAPTCHA.
How CapMonster Cloud MCP works
With MCP, an AI agent can identify the CAPTCHA type and task parameters, access CapMonster Cloud documentation, create tasks, and retrieve solution results. The agent’s ultimate goal is not only to solve the CAPTCHA, but also to correctly integrate this process into the user’s project.
To work with a web page, CapMonster Cloud MCP can be used together with the browser MCP capmonster-mcp-patchright:
AI agent
├── capmonster → CapMonster Cloud API
└── patchright → browser
capmonster handles interaction with CapMonster Cloud. patchright opens the page, helps identify the CAPTCHA type and retrieve its parameters, and applies the completed solution. The agent then transfers the verified workflow into the project code.
The typical workflow covered by SKILL.md:
-
Get the target page URL.
-
Identify the CAPTCHA type.
-
Review the documentation and determine the required parameters.
-
Retrieve the parameters from the page.
-
Send a request to CapMonster Cloud.
-
Retrieve the result.
-
Apply the result on the page and integrate this workflow into the user’s code.
Use automation only on resources where you are authorized to do so, such as your own website, a test environment, or a demo page.
Quick start
Choose the prompt that matches your environment — Python / PyPI or TypeScript / npm — and click Copy prompt. Then paste it into Claude Code, Codex, or another AI agent. The agent will detect the client and operating system, configure capmonster and patchright, and verify that they work.
If automatic setup fails, configure MCP manually using the instructions.
- Python / PyPI
- TypeScript / npm
After verification, provide the agent with the target page URL, project files, and the conditions under which the CAPTCHA appears. The agent should not only verify the solution in the browser, but also integrate the working CapMonster Cloud workflow into your code.
The agent may request permission to install dependencies, modify the MCP configuration, run commands, access the network, or control the browser. Review each request and confirm expected actions by clicking Allow or Approve.
In Codex, you can check or change the current permission mode with the /permissions command.
You do not need to resend the prompt before every task. In the current session, after SKILL.md has been loaded, you can provide new URLs, CAPTCHA appearance conditions, and integration tasks.
Manual setup
You can work with the agent through a desktop application, terminal, IDE, or code editor. For the complete workflow, we recommend connecting both servers: capmonster and patchright.
Choose how you want to work — with a CLI agent or a desktop application. Each tab contains the full setup sequence for the selected option.
- CLI agent
- Desktop application
You need an AI agent or another application that supports MCP.
If the agent is already installed, make sure it starts correctly and is available in your system.
For example, for Claude Code:
claude --version
For Codex:
codex --version
If the command is not found, install the selected AI agent according to its official instructions: Claude Code or Codex.
After installation, make sure the agent starts correctly and supports local MCP servers.
If the terminal or IDE cannot find the installed agent, fully close and reopen the terminal and development environment. Applications that were already running may still use the old PATH value and may not detect the new command until restarted.
Running the MCP servers requires npx and, depending on the selected CapMonster MCP implementation, uvx.
Node.js and npx
patchright runs through npx, so Node.js is required regardless of which CapMonster MCP implementation you choose.
Check the installation:
node --version
npm --version
npx --version
If the commands are unavailable, install Node.js.
npm and npx are usually installed with Node.js, so you do not need to install npx separately.
We recommend using Node.js 18 or later.
uv and uvx
If you plan to use the Python/PyPI version of capmonster-mcp, you also need uvx.
Check whether it is available:
uvx --version
If the command is unavailable, install uv.
After installing uv, the uvx command will also become available.
Check:
uv --version
uvx --version
If you use the TypeScript/npm version of capmonster-mcp, you do not need to install uv or uvx.
capmonster requires a CapMonster Cloud API key.
It is passed to the MCP server through the following environment variable:
CM_API_KEY
Two equivalent capmonster-mcp implementations are available.
- npm – TypeScript
- PyPI – Python
This version uses the capmonster-mcp npm package and npx.
Run the MCP server with:
npx -y capmonster-mcp
This version uses the capmonster-mcp PyPI package and uvx.
Run the MCP server with:
uvx capmonster-mcp
You do not need to install capmonster-mcp as a dependency of your project. By default, the MCP client can run the published package directly through npx or uvx.
By default, you do not need to preinstall the MCP packages: you can run them directly through npx or uvx. If you want to install the packages in advance, use one of the options below.
- npm
- pip / PyPI
CapMonster Cloud MCP
Install capmonster-mcp with npm:
npm i capmonster-mcp
You can verify the installation with:
npm list capmonster-mcp
After installation, use npx to run capmonster:
{
  "command": "npx",
  "args": ["capmonster-mcp"],
  "env": {
    "CM_API_KEY": "YOUR_API_KEY"
  }
}
Patchright MCP
If you plan to use a browser to open pages, retrieve CAPTCHA parameters, and apply solutions, install capmonster-mcp-patchright. The source code is available in the official repository:
npm i capmonster-mcp-patchright
You can verify the installation with:
npm list capmonster-mcp-patchright
Preinstalling capmonster-mcp-patchright is optional. In all examples below, you can also run it directly with:
npx -y capmonster-mcp-patchright
The Python version of capmonster-mcp is published on PyPI and requires Python 3.11 or later.
Install capmonster-mcp with pip:
python -m pip install capmonster-mcp
You can verify the installation with:
python -m pip show capmonster-mcp
After installation, you can use the same CLI command for capmonster:
{
  "command": "capmonster-mcp",
  "args": [],
  "env": {
    "CM_API_KEY": "YOUR_API_KEY"
  }
}
After installing the npm or Python package, fully restart the MCP client if the package was installed after the client had already been started.
Step 5. Configure the MCP client
Select the CLI client you use.
- Claude Code
- Codex CLI
For a shared project configuration, create an .mcp.json file in the project root and add capmonster and patchright to it.
This is not the only possible location. Claude Code supports different configuration scopes; user-specific or project-specific settings may also be stored in .claude.json or added with Claude Code commands. If an agent is configuring MCP, allow it to determine the appropriate scope and file automatically.
- TypeScript / npm
- Python / PyPI
{
  "mcpServers": {
    "capmonster": {
      "command": "npx",
      "args": ["-y", "capmonster-mcp"],
      "env": {
        "CM_API_KEY": "YOUR_API_KEY"
      }
    },
    "patchright": {
      "command": "npx",
      "args": ["-y", "capmonster-mcp-patchright"]
    }
  }
}
{
  "mcpServers": {
    "capmonster": {
      "command": "uvx",
      "args": ["capmonster-mcp"],
      "env": {
        "CM_API_KEY": "YOUR_API_KEY"
      }
    },
    "patchright": {
      "command": "npx",
      "args": ["-y", "capmonster-mcp-patchright"]
    }
  }
}
After restarting Claude Code, check the connection with the /mcp command.
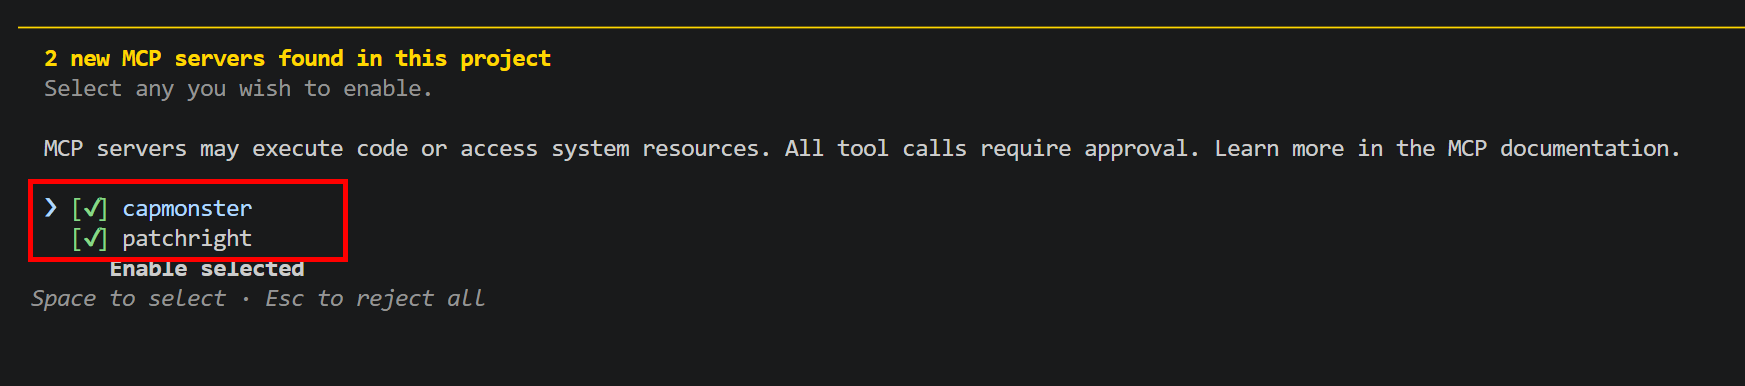
Codex CLI, the Codex IDE extension, and ChatGPT Desktop share the same MCP configuration. By default, it is stored in config.toml:
- Windows:
%USERPROFILE%\.codex\config.toml; - macOS/Linux:
~/.codex/config.toml.
To connect MCP servers, use the codex mcp add command. Codex will automatically save the settings to config.toml. You need to add the capmonster and patchright servers separately by running the corresponding command for each one.
- Windows
- macOS / Linux
Open PowerShell or the integrated terminal in your IDE.
For the TypeScript/npm version of capmonster, run:
codex mcp add capmonster --env CM_API_KEY=YOUR_API_KEY -- npx.cmd -y capmonster-mcp
For the Python/PyPI version, run instead:
codex mcp add capmonster --env CM_API_KEY=YOUR_API_KEY -- uvx capmonster-mcp
Then, regardless of the implementation you selected, add patchright:
codex mcp add patchright -- npx.cmd -y capmonster-mcp-patchright
On Windows, npx.cmd is used so that starting the MCP server does not depend on the PowerShell execution policy for npx.ps1.
Open a terminal.
For the TypeScript/npm version of capmonster, run:
codex mcp add capmonster --env CM_API_KEY=YOUR_API_KEY -- npx -y capmonster-mcp
For the Python/PyPI version, run instead:
codex mcp add capmonster --env CM_API_KEY=YOUR_API_KEY -- uvx capmonster-mcp
Then, regardless of the implementation you selected, add patchright:
codex mcp add patchright -- npx -y capmonster-mcp-patchright
Replace YOUR_API_KEY with your CapMonster Cloud API key. Do not add the real key to agent messages, code examples, or a public repository.
Verify that both servers have been added:
codex mcp list
Alternatively: configure the servers through config.toml
For a trusted project, you can also save the configuration to .codex/config.toml in the project root. The project file will only be used after the project has been marked as trusted.
- TypeScript / npm
- Python / PyPI
[mcp_servers.capmonster]
command = "npx"
args = ["-y", "capmonster-mcp"]

[mcp_servers.capmonster.env]
CM_API_KEY = "YOUR_API_KEY"

[mcp_servers.patchright]
command = "npx"
args = ["-y", "capmonster-mcp-patchright"]
[mcp_servers.capmonster]
command = "uvx"
args = ["capmonster-mcp"]

[mcp_servers.capmonster.env]
CM_API_KEY = "YOUR_API_KEY"

[mcp_servers.patchright]
command = "npx"
args = ["-y", "capmonster-mcp-patchright"]
On Windows, if you have problems running npx.ps1, specify command = "npx.cmd" instead of command = "npx". If the initial package download takes too long, you can add startup_timeout_sec = 60 to each server section.
Fully restart Codex or your IDE. In a new session, run /mcp and make sure capmonster and patchright are connected and expose their tools. For details, see the Codex MCP documentation.
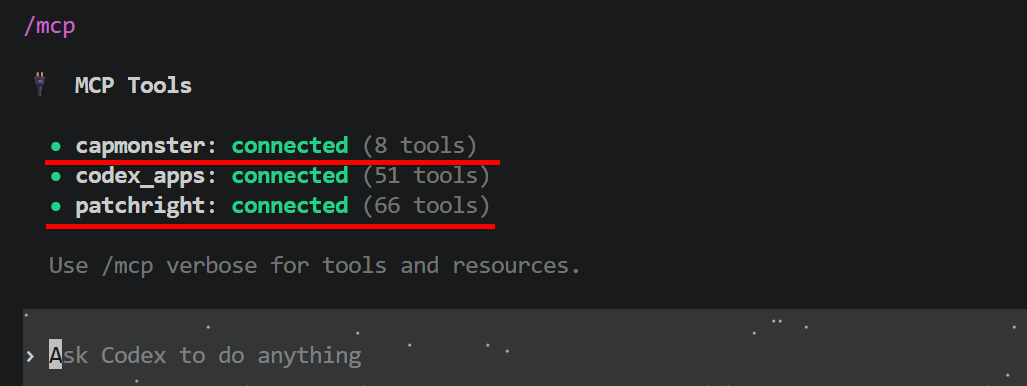
Replace YOUR_API_KEY with your CapMonster Cloud API key and restart the MCP client.
Open a new chat or session and send the prompt from the Quick start section. After verification, provide the page URL, project files, and the conditions under which the CAPTCHA appears.
During setup, approve only expected permission requests. You do not need to resend the prompt before every task in the current session.

CapMonster Cloud MCP can be used not only through CLI agents, but also through desktop applications that support local MCP servers.
For example:
- Claude Desktop;
- ChatGPT Desktop with Codex;
- another desktop client that supports local STDIO MCP servers.
In this case, you do not need to start the AI agent from the terminal. MCP servers are configured in the application itself or in its configuration file.
Step 1. Install a desktop application
Install the selected MCP-compatible desktop client:
If the application is already installed, make sure you are using the latest version.
Step 2. Get an API key and install the runtime
To use capmonster, get a CapMonster Cloud API key. During setup, pass it through the CM_API_KEY environment variable.
Running patchright requires Node.js and npx.
Check the installation:
node --version
npm --version
npx --version
If the commands are unavailable, install Node.js. npm and npx are usually installed together with Node.js.
If you use the Python/PyPI version of capmonster, you also need uvx.
Check:
uv --version
uvx --version
If uvx is unavailable, install uv.
For the TypeScript/npm version of capmonster-mcp, you do not need to install uv or uvx.
Step 3. Configure the MCP servers
- Claude Desktop
- ChatGPT Desktop / Codex
Claude Desktop uses a separate local MCP configuration file — claude_desktop_config.json.
In Claude Desktop, open File → Settings → Developer and click Edit Config. Add the capmonster and patchright servers to the file that opens.
- TypeScript / npm
- Python / PyPI
{
  "mcpServers": {
    "capmonster": {
      "command": "npx",
      "args": ["-y", "capmonster-mcp"],
      "env": {
        "CM_API_KEY": "YOUR_API_KEY"
      }
    },
    "patchright": {
      "command": "npx",
      "args": ["-y", "capmonster-mcp-patchright"]
    }
  }
}
{
  "mcpServers": {
    "capmonster": {
      "command": "uvx",
      "args": ["capmonster-mcp"],
      "env": {
        "CM_API_KEY": "YOUR_API_KEY"
      }
    },
    "patchright": {
      "command": "npx",
      "args": ["-y", "capmonster-mcp-patchright"]
    }
  }
}
Replace YOUR_API_KEY with your CapMonster Cloud API key, save the configuration, and fully restart Claude Desktop.
After restarting, click + next to the input field and open Connectors. Make sure capmonster and patchright appear in the list. You can also check connection status and startup errors in Claude Desktop Developer settings.
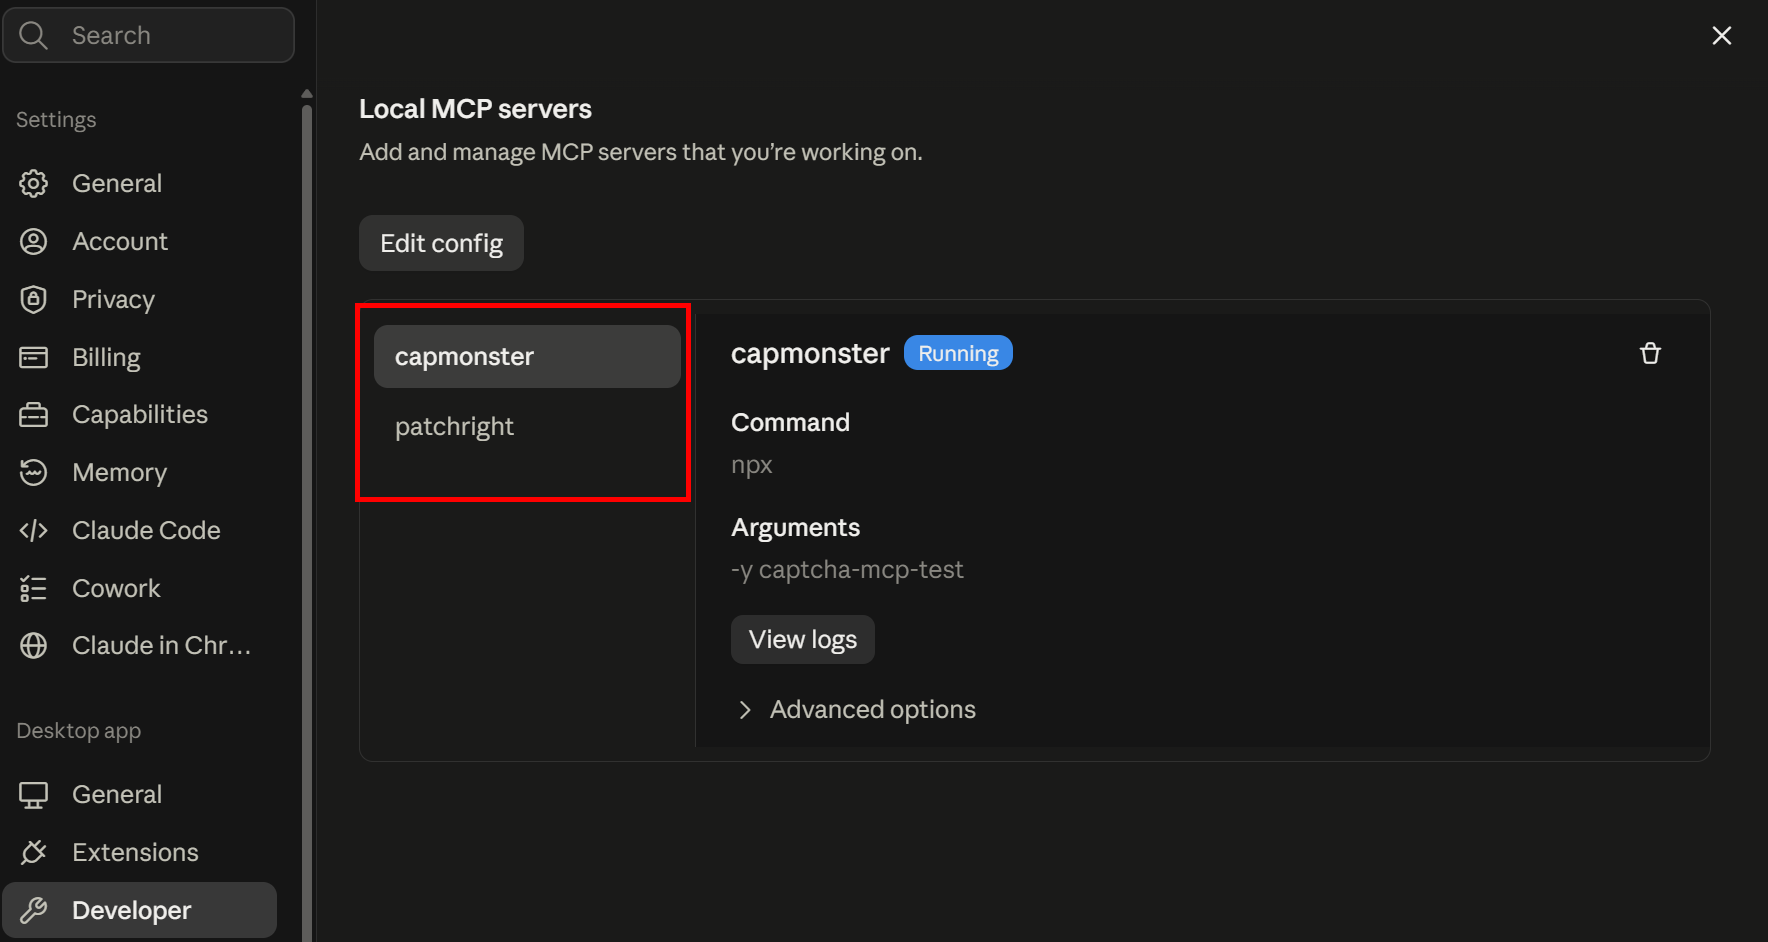
Local MCP servers configured in Claude Desktop through claude_desktop_config.json are separate from Claude Code project and user MCP configurations.
You can configure MCP servers manually through the config.toml file used by ChatGPT Desktop, Codex CLI, and the Codex IDE extension.
1. Open or create the configuration file
- Windows
- macOS / Linux
The file is located at:
%USERPROFILE%\.codex\config.toml
To create the directory and open the file in Notepad, run the following in PowerShell:
New-Item -ItemType Directory -Force "$env:USERPROFILE\.codex"
notepad "$env:USERPROFILE\.codex\config.toml"
If you are prompted to create a new file, confirm it. Make sure the file is saved with the .toml extension, not .toml.txt.
The file is located at:
~/.codex/config.toml
To create the directory and open the file in nano, run:
mkdir -p ~/.codex
nano ~/.codex/config.toml
2. Add the MCP server configuration
Paste one of the following configurations into config.toml. If the file already contains other settings, do not remove them — add the mcp_servers blocks at the end of the file.
- TypeScript / npm
- Python / PyPI
[mcp_servers.capmonster]
command = "npx"
args = ["-y", "capmonster-mcp"]

[mcp_servers.capmonster.env]
CM_API_KEY = "YOUR_API_KEY"

[mcp_servers.patchright]
command = "npx"
args = ["-y", "capmonster-mcp-patchright"]
If PowerShell policy blocks npx, specify command = "npx.cmd" for both servers.
[mcp_servers.capmonster]
command = "uvx"
args = ["capmonster-mcp"]

[mcp_servers.capmonster.env]
CM_API_KEY = "YOUR_API_KEY"

[mcp_servers.patchright]
command = "npx"
args = ["-y", "capmonster-mcp-patchright"]
If PowerShell policy blocks npx, specify command = "npx.cmd" in the mcp_servers.patchright section.
Replace YOUR_API_KEY with your CapMonster Cloud API key and save the file.
3. Restart the application
Fully quit ChatGPT Desktop or Codex, then open the application again.
In a new chat, run:
/mcp
Make sure the connected capmonster and patchright servers appear in the list.
Open a new chat and send the prompt from the Quick start section. After verification, provide the page URL, CAPTCHA appearance conditions, and project files.
During setup, approve only expected permission requests. You do not need to resend the prompt before every task in the current session.
The main difference between the desktop and CLI options is how the MCP servers are connected. The workflow and initial prompt remain the same.
Available tools
After connecting the MCP servers, the tools become available to the AI agent automatically. You usually do not need to select them manually — the agent calls the appropriate tools based on the current task.
CapMonster Cloud
capmonster-mcp provides the following tools:
get_supported_tasks— returns the supported CapMonster Cloud task types;get_task_parameters(task_type)— returns the parameters for the selected task type and the solution schema;get_docs(url, offset, limit, section)— loads CapMonster Cloud documentation;create_task(task)— creates a task and returnstaskId;get_task_result(task_id)— checks the task status once;get_task_result_wait(task_id, timeout_seconds, poll_interval_seconds)— automatically waits for the task to complete;get_actual_user_agent()— returns the current Windows User-Agent;get_balance()— returns the CapMonster Cloud account balance.
Patchright
capmonster-mcp-patchright provides tools for browser interaction. The agent accesses them through the MCP client and selects the required actions automatically.
The current list of tools is available in the official repository and on the capmonster-mcp-patchright npm package page.
Troubleshooting
If the setup does not work, send the error message to the agent. It can check the runtime, startup commands, user and project MCP configurations, and suggest or apply the required fixes.
The MCP server does not start
Make sure the command from the configuration is available in the same environment where the MCP client is running:
- TypeScript / npm
- Python / PyPI
node --version
npx --version
npx -y capmonster-mcp
uvx --version
uvx capmonster-mcp
If the command starts and produces no output, this is not necessarily an error: the STDIO MCP server is waiting for a client connection. You can stop the test run with Ctrl+C.
Also make sure that:
-
the JSON configuration contains no comments, trailing commas, or unclosed brackets;
-
the
mcpServers,command,args, andenvfield names are spelled correctly; -
the MCP client was fully restarted after the configuration was changed;
-
package downloads through
npxoruvxare not blocked by the network, proxy, antivirus software, or corporate policy.
The capmonster-mcp command is not found after installing the package
A preinstalled CLI command must be available in the PATH of the process that starts the MCP client.
Check the command location:
- Windows
- macOS / Linux
where.exe capmonster-mcp
which capmonster-mcp
If the terminal can find the command but the desktop application cannot, fully close and reopen the application. If necessary, specify the full path to the executable in the command field.
capmonster or patchright tools are not displayed
Ask the agent to check where the current session loads its MCP configuration from. The location depends on the client, configuration scope, and how the server was connected:
-
in Claude Code, servers can be configured at the project or user level; the configuration may be stored in
.mcp.json,.claude.json, or managed with Claude Code commands; -
Claude Desktop uses
claude_desktop_config.json; -
Codex uses
~/.codex/config.toml,%USERPROFILE%\.codex\config.toml, or a project-level.codex/config.toml; -
in ChatGPT Desktop, local servers can also be added through the MCP settings.
After fixing the configuration, fully restart the client and open a new session. In Claude Code, you can check the connection with /mcp; in Codex, use /mcp or codex mcp list.
get_balance returns an error
Ask the agent to check the capmonster configuration. Usually, you need to make sure that:
-
the
CM_API_KEYvariable contains a valid CapMonster Cloud API key; -
the placeholder
YOUR_API_KEYhas been replaced; -
the key is passed in the
envblock of thecapmonsterserver, notpatchright.
After changing the key, restart the MCP client. The agent can then check the connection and balance again.
If the balance is zero, top it up before creating tasks.
get_docs does not load the documentation
Ask the agent to check the MCP client’s network access to https://docs.capmonster.cloud/ and whether it can load the following file:
https://docs.capmonster.cloud/llms.txt
If the documentation is temporarily unavailable or the task parameters need additional verification, the agent can use the API specification:
https://api.capmonster.cloud/docs/swagger-ui/spec.js
patchright does not open the page
Check node, npx, and the startup command:
npx -y capmonster-mcp-patchright
If the page requires a proxy, User-Agent, or locale, provide these parameters to the agent. It can use them when launching the browser through patchright.
The task returns an error or the website rejects the solution
Provide the agent with the error message and the conditions under which the CAPTCHA appears. For diagnostics, it can:
-
check the supported task type;
-
retrieve the current parameters and solution schema;
-
open the documentation for the selected CAPTCHA type;
-
retrieve dynamic parameters again after reloading or invoking the CAPTCHA again;
-
verify that the User-Agent, proxy, cookies, headers, and Client Hints are consistent for session-bound CAPTCHAs;
-
make sure the result is applied in the format required for the specific CAPTCHA type.
Do not use expired challenge, token, data, blob, or other one-time parameters.
ERROR_INVALID_TASK usually indicates invalid or outdated parameters. ERROR_CAPTCHA_UNSOLVABLE may be a temporary error — the agent can verify the input data and create a new task.
Frequently asked questions
Do I need to select and call MCP tools manually?
No. After the MCP servers are connected, the tools automatically become available to the AI agent. The agent selects and calls them based on the current task.
Do I need to connect both MCP servers?
No. You can use capmonster on its own if the CAPTCHA parameters are already known and browser interaction is not required. patchright is needed when the agent must open a page, retrieve CAPTCHA parameters, or apply the solution.
Which implementation should I choose: npm or Python?
Both capmonster-mcp implementations provide the same tools. Choose the option that matches your environment:
-
npm — if Node.js and
npxare already installed; -
Python — if you use Python 3.11 or later and have
uvxinstalled.
patchright requires Node.js and npx in either case.
Where should I store the API key?
Pass the API key through the CM_API_KEY environment variable in the capmonster server configuration. Do not include it in the prompt, chat messages, code examples, or a public repository.
If the configuration file contains a real key, exclude it from Git or use a secure secret storage mechanism supported by the MCP client.
Do I need to send the prompt before every CAPTCHA?
No. After setup, within the current session, it is enough to provide new URLs, CAPTCHA appearance conditions, and integration tasks.
In a new session, we recommend sending the prompt again if the agent does not retain the loaded instructions and environment verification results.
How can I check which CAPTCHA types are supported?
Ask the agent to identify the supported CAPTCHA types. It can use get_supported_tasks, and for a specific task, get_task_parameters(task_type) and the documentation through get_docs.
Do I need to configure a proxy in the MCP configuration?
Not necessarily. If the browser requires a proxy, provide its parameters to the agent — it can use them when launching the browser without changing the MCP configuration.
If the selected CAPTCHA type requires your own proxy, the agent must also pass its parameters in the CapMonster Cloud task. For CAPTCHAs bound to an IP address or session, the same proxy must be used in both the browser and the task.